
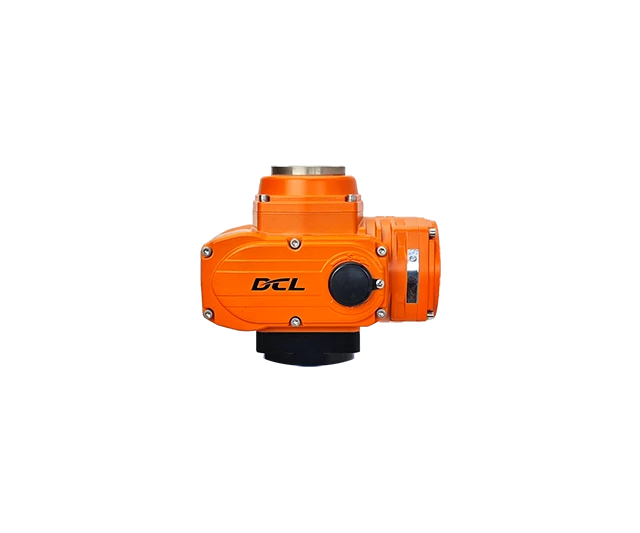
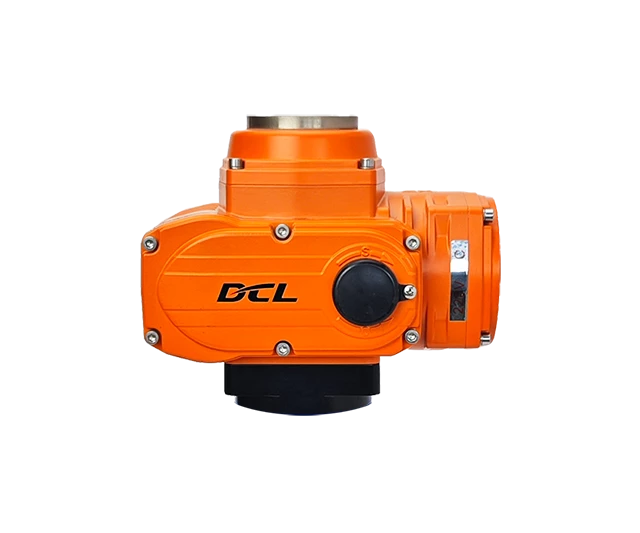
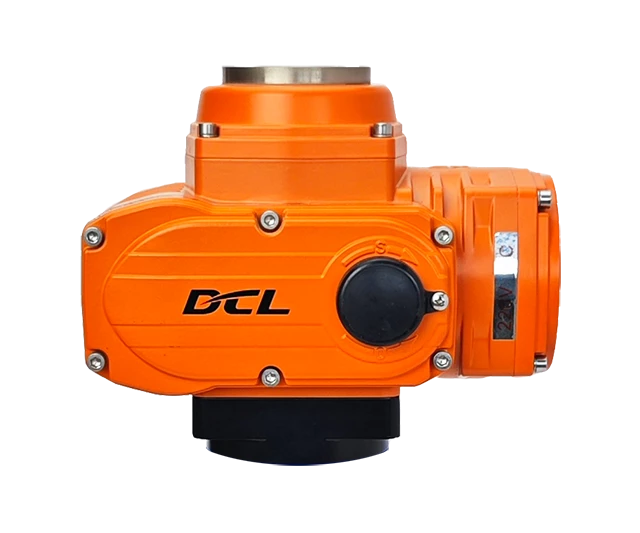


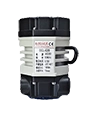
Tooted

Technical Parameters

Explosion Proof GradeExd II CT4Gb
Power SupplyDC24V, AC110V, AC220V, AC380V
Standard Torque/TimeDC24V: 200Nm/60S
AC110V/AC220V/AC380V: 200Nm/30S
Optional Torque/Time50Nm/15S, 200Nm/60S
Rotation Angle RangeAdjustable from 0 to 90 degrees
Motor Power/CurrentDC24V: 25W/3.12A
AC110V: 40W/0.63A
AC220V: 40W/0.35A
AC380V: 30W /0.19A
Control CircuitType A/B/C/D/E/F/G/H
Weight5.5kg
Insulation Resistance DC24V: 100MΩ/250VDC
AC110V/AC220V/AC380V: 100MΩ/500VDC
Withstand VoltageDC24V/AC24V: 500VAC for 1 minute
Water Proof LevelIP68
Installation360 ° installation at any angle
Electrical Interface2-M20x1.5 explosion-proof plug, users should install corresponding explosion-proof cable connectors according to the selected cable during use
Working Temperature-20℃~﹢60℃
Optional Function♦ Over torque protection ♦ Dehumidification heater
Modulation Parameters
Sisendsignaal4~20mA, 0~10V arbitrary calibration
output Signal4~20mA, 0~10V arbitrary calibration
Bus485/Modbus/CAN
Internet of ThingsWIFI/LoRA/4G
Basic Error≤±1%
Return Error≤1%
HysteresisAdjustable from 0.5% to 5.0%
Reposition Times0 times
Repeatability Error≤1%

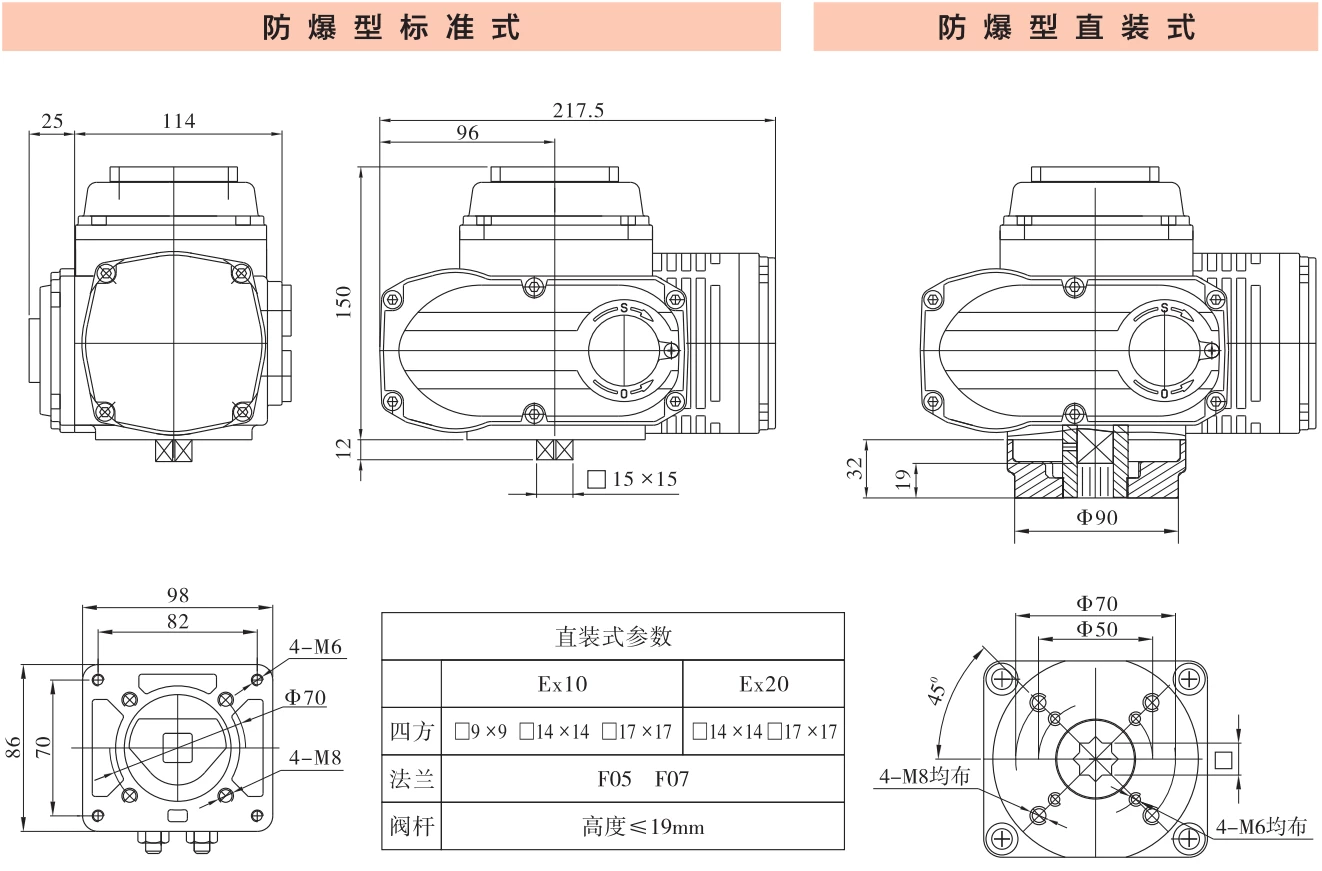
Dimensions

华易防爆执行器安装形式 | DCL Explosion-Proof Actuator Installation Demension
华易Exd II CT4Gb执行器 DCL-Ex10 DCL-Ex20 外型安装尺寸

Application Circuit

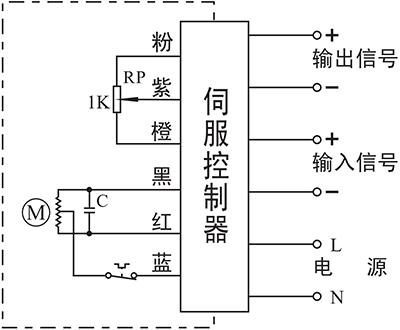
Moduleerimine

E - Juhtseadmega moduleerimine

  • Sisend: 4~20mA / 0~10V
  • Väljund: 4~20mA / 0~10V
  • Välisiin:Modbus / CAN
  • IIot:WIFI/LoRA/4G DTU


Connecting Details:

  1. Connecting AC85-220V supply power line to L and neutral to N.
  2. Connecting 4-20mA/2-10V input signal source from control system to input-/+.
  3. Connecting Output -/+ to the system to send out the real-time valve position.

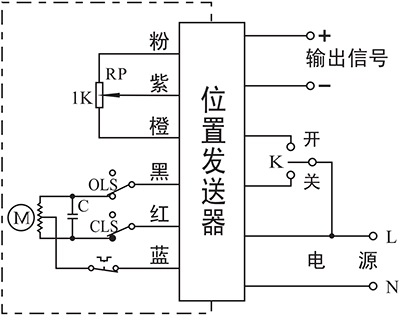
Sügavliikumine ja positsioneerimine

F - Positsioneerimisüksusega

  • Juhtige ajamit avamiseks või sulgemiseks K-ga
  • The real-time valve position will be send out as a 4-20mA signal.


Connecting Details:

  1. Connecting AC85-220V supply power line to L and neutral to N.
  2. Switch AC85-220V line to CLOSE(P2) to close the valve.
  3. Switch AC85-220V line to OPEN(P3) to open the valve.
  4. Connecting Output -/+ to the system to send out the real-time valve position.

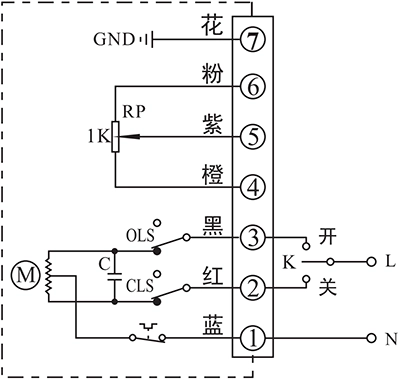
C - 1KΩ/500Ω potentsiomeetriga

  • Juhtige ajamit avamiseks või sulgemiseks K-ga
  • Reaalajas klapi asend saadetakse välja potentsiomeetri takistusväärtusena.


Connecting Details:

  1. Connecting AC85-220V supply power neutral to P1.
  2. Switch AC85-220V line to CLOSE(P2) to close the valve
  3. Switch AC85-220V line to OPEN(P3) to open the valve.
  4. P4 is the low side of potentiometer that is normally connected to signal GND.
  5. Connecting signal input of  control system to P5. The resistance value between P4 and P5 will become higher as actuator opening the valve, while the value between P5 and P6 will become lower.
  6. P6 is the high side of potentiometer that is normally connected to signal power.
  7. Connect earth to P7.

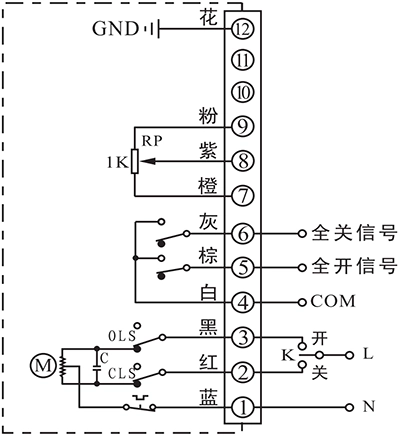
D - Potentsiomeetri ja lõppasendi tagasisidega

  • Juhtige ajamit avamiseks või sulgemiseks K-ga
  • Reaalajas klapi asend saadetakse välja potentsiomeetri takistusväärtusena.
  • Lõppasendi AVATUD/SULETUD väljundklemm saadab sündmuse passiivse signaali kujul, kui lõppasend on saavutatud.


Connecting Details:

  1. Connecting AC85-220V supply power neutral to P1.
  2. Switch AC85-220V line to CLOSE(P2) to close the valve
  3. Switch AC85-220V line to OPEN(P3) to open the valve.
  4. P4 is the COM for passive contact signal of end-position OPEN/CLOSE which is normally connected to signal GND.
  5. P5 is end-position OPEN terminal which will be connected to COM when actuator reached end-position of open.
  6. P6 is end-position CLOSE terminal which will be connected to COM when actuator reached end-position of close.
  7. P7 is the low side of potentiometer that is normally connected to signal GND.
  8. Connecting signal input of  control system to P8. The resistance value between P7 and P8 will become higher as actuator opening the valve, while the value between P8 and P9 will become lower.
  9. P9 is the high side of potentiometer that is normally connected to signal power.
  10. Connect earth to P12.

SEES - VÄLJAS

A - 2 aktiivse lõppasendi signaaliväljundiga

  • Juhtige ajamit avamiseks või sulgemiseks K-ga
  • Lõppasendi AVATUD/SULETUD väljundklemm saadab sündmuse 220 V AC aktiivse signaalina, kui lõppasend on saavutatud.


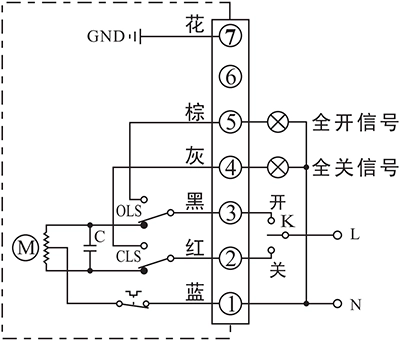
Connecting Details:

  1. Connecting AC85-220V supply power neutral to P1.
  2. Switch AC85-220V line to CLOSE(P2) to close the valve
  3. Switch AC85-220V line to OPEN(P3) to open the valve.
  4. P5 is end-position OPEN terminal which will output a AC220V source which can be used to drive an Indication light when actuator reached end-position of open.
  5. P6 is end-position OPEN terminal which will output a AC220V source which can be used to drive an Indication light when actuator reached end-position of close.
  6. Connect earth to P7.

B - Kahe passiivse lõppasendi lülitiga

  • Juhtige ajamit avamiseks või sulgemiseks K-ga
  • Lõppasendi AVATUD/SULETUD väljundklemm saadab sündmuse passiivse signaali kujul, kui lõppasend on saavutatud.


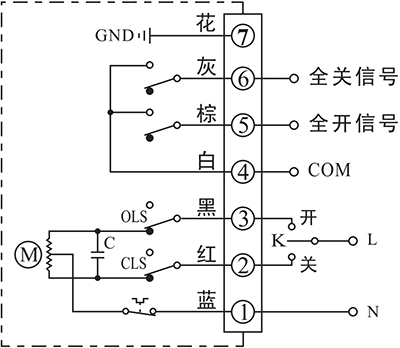
Connecting Details:

  1. Connecting AC85-220V supply power neutral to P1.
  2. Switch AC85-220V line to CLOSE(P2) to close the valve
  3. Switch AC85-220V line to OPEN(P3) to open the valve.
  4. P4 is the COM for passive contact signal of end-position OPEN/CLOSE which is normally connected to signal GND.
  5. P5 is end-position OPEN terminal which will be connected to COM when actuator reached end-position of open.
  6. P6 is end-position CLOSE terminal which will be connected to COM when actuator reached end-position of close.
  7. Connect earth to P7.

G - kahe lõppasendi lülitiga alalisvoolumootor

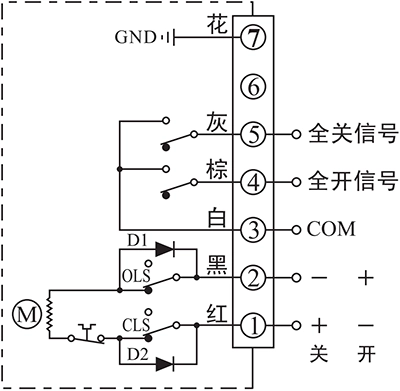
  • Juhtige ajamit avama või sulgema toitepinge suuna abil klemmide 1 ja 2 vahel
  • Lõppasendi AVATUD/SULETUD väljundklemm saadab sündmuse passiivse signaali kujul, kui lõppasend on saavutatud.


Connecting Details:

  1. Connecting DC24V+ to P1 and DC24V- to P2 to close the valve.
  2. Connecting DC24V+ to P2 and DC24V- to P1 to close the valve.
  3. P3 is the COM for passive contact signal of end-position OPEN/CLOSE which is normally connected to signal GND.
  4. P4 is end-position OPEN terminal which will be connected to COM when actuator reached end-position of open.
  5. P5 is end-position CLOSE terminal which will be connected to COM when actuator reached end-position of close.
  6. Connect earth to P7.

H - 3-faasiline 380 V vahelduvvoolumootor kahe lõppasendi lülitiga

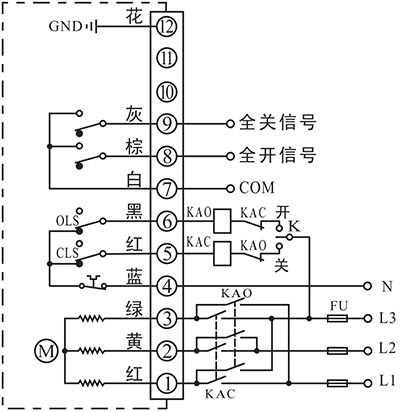
  • Välise inverteri abil saab ajamit avada või sulgeda, et muuta toitepinge faasi.
  • Lõppasendi AVATUD/SULETUD väljundklemm saadab sündmuse passiivse signaali kujul, kui lõppasend on saavutatud.


Connecting Details:

  1. Connecting a 3 phase AC380V inverter output to P1, P2 and P3, then the actuator can be controlled to open or close the valve by change the 3 phase order.
  2. Connecting AC380V neutral to N(P4).
  3. P5 is used for cooperating with an external switch to control the inverter 3 phase order. This terminal is connected to N(P4) when actuator is not in end-position of CLOSE and disconnected from N(P4) after actuator reached end-position of CLOSE.
  4. P6 is used for cooperating with an external switch to control the inverter 3 phase order. This terminal is connected to N(P4) when actuator is not in end-position of OPEN and disconnected from N(P4) after actuator reached end-position of OPEN.
  5. P7 is the COM for passive contact signal of end-position OPEN/CLOSE which is normally connected to signal GND.
  6. P8 is end-position OPEN terminal which will be connected to COM when actuator reached end-position of open.
  7. P9 is end-position CLOSE terminal which will be connected to COM when actuator reached end-position of close.
  8. Connect earth to P12.

Märkus:

  • Katkendliku kasti sees olev vooluring on ajami sisemine vooluring. Väljas olev vooluring aga demonstreerib ajami elektriühendust.
  • Kui teil on ühendusahela kohta muid erinõudeid, võtke julgelt ühendust meie tehnilise toega. 

Choose another actuator with different torque​

50 Nm/20S

————————–

Valikuline koos

20 Nm/4S

30 Nm/10S

50 Nm/60S

100 Nm/30S

————————–

Valikuline koos

50 Nm/15S

100 Nm/60S


200 Nm/30S

————————–

Valikuline koos

100 Nm/15S

200 Nm/60S


400 Nm/30S

————————–

Valikuline koos

200 Nm/15S

400 Nm/60S


Pakkumistaotlus

Vajuta kohe nuppu „Saada“, me kinnitame sinuga hiljem toote mudelinumbri ja kohaliku edasimüüja ning saadame sulle seejärel hinnapakkumise.

WhatsApp

Skanneeri QR-koodi, et meie inseneriga kohe vestelda...

Pakkumistaotlus

Vajuta kohe nuppu „Saada“, me kinnitame sinuga hiljem toote mudelinumbri ja kohaliku edasimüüja ning saadame sulle seejärel hinnapakkumise.

WhatsApp

Skanneeri QR-koodi, et meie inseneriga kohe vestelda...

Pakkumistaotlus

Vajuta kohe nuppu „Saada“, me kinnitame sinuga hiljem toote mudelinumbri ja kohaliku edasimüüja ning saadame sulle seejärel hinnapakkumise.

WhatsApp

Skanneeri QR-koodi, et meie inseneriga kohe vestelda...

🤝 Tee meiega koostööd oma brändi loomiseks

✅ ODM

  • Teie logo ja pakend
  • Kohandatud väljundvormingud (4–20 mA, RS485 Modbus, HART jne)
  • Korpuse värvi või sildi muudatused
  • Pilvevalmidusega versioonid (valikuline)

✅ OEM

  • Järgige rangelt oma disaini ja spetsifikatsioone
  • Täielik konfidentsiaalsus ja intellektuaalomandi kaitse
  • Kvaliteetne toodang konkurentsivõimelise hinnaga
  • Väikepartii või suurtootmine
  • 🏭 Ettevõttesisene teadus- ja arendustegevus ning tootmineTrükkplaadist korpuseni – kõik ühe katuse all.
  • 💬 Mitmekeelne tugiInglise keelt kõnelevad insenerid ja müügipersonal.

  • ⚙️ Paindlik MOQToetus nii idufirmadele kui ka globaalsetele kaubamärkidele.

  • 🚀 Kiire prototüüpimineProovi kohaletoimetamine 7–10 päeva jooksul.

 Võtke meiega juba täna ühendust tootekataloogi tellimiseks või tasuta konsultatsiooni saamiseks.

Pakkumistaotlus

Saada päring

WhatsApp

Skanneeri QR-koodi, et meie inseneriga kohe vestelda...

Võta meiega ühendust

Telefon

(+86) 130 2633 1611

WhatsApp

Ken Bryan

即时客服图标 | Reaalajas sõnumi ikoon

Saidi vestlus

Meiega vestlemiseks klõpsake paremas alanurgas oleval ikoonil...